
A Minecraft server for my kids
Tech: AWS - EC2 - Terraform - Minecraft - Systemctl - Ubuntu
Posted: 2021-02-28
Last Updated: 2021-02-28
Wait... what?
I was looking for a way to demonstrate deploying EC2 instances into my VPC but was looking for a real world problem to solve while I did it. As it turns out, despite all efforts to insulate them from the insidious lure of gaming (read mom), my kids LOVE Minecraft. I have been into technology for most of my life, and make a living off of my knowledge of it, but I am not a gamer. Until now I have never had the motivation to try setting up a Minecraft server but now that the kids have tasted the forbidden fruit of multiplayer video games they, of course, want to play online with their friends. You can purchase a server online from about 5000 different places and be done with it but it isn't exactly cheap for anything bigger than a Raspberry PI and this is my chance to look cool to my kids by being a hacker (my kids define hacker as anything cool you can do with a computer that involves a terminal window). So, in the spirit of all who enjoy watching people change the gear ratio on a riding lawnmower to make it go 40 mph, I thought I can contribute to my children's delinquency by giving them a variably sized Minecraft server that they can fire up whenever they want AND make a blog post. Given this obvious pressing need, I decided to set the kids up with an automatically deployed Minecraft server using Terraform and AWS. It saves their world in between sessions in an S3 bucket so we can completely tear it down when they are not using it but can start up a new server on demand right where they left off in the game.
Ok, so now that we have an important real world problem to solve, lets list our requirements and plan out an architecture:
- We are obviously going to need some compute so we'll use an EC2 ami with Ubuntu which will require a VPC.
- We want to be secure so we need a way to feed in an arbitrary list of allowed IP addresses that can access the instance (Route table and Security Group).
- We need to install software and have it start up automatically (User Data and Systemctl).
- We need to preserve game state from previous sessions (S3).
- We need a simple way to distribute access to our server across the planet (AWS).
- To prove our servers are alive and accessible we will install an Apache HTTP Server.
- Seeing as we are already here - with a few more lines of code - we can show how a private subnet works with a NAT gateway (all the Minecraft stuff works fine without these parts) and demonstrate the difference between a public and private instance.
This diagram shows our basic architecture and gives us a way to break down our components into distinct stories for implementation.
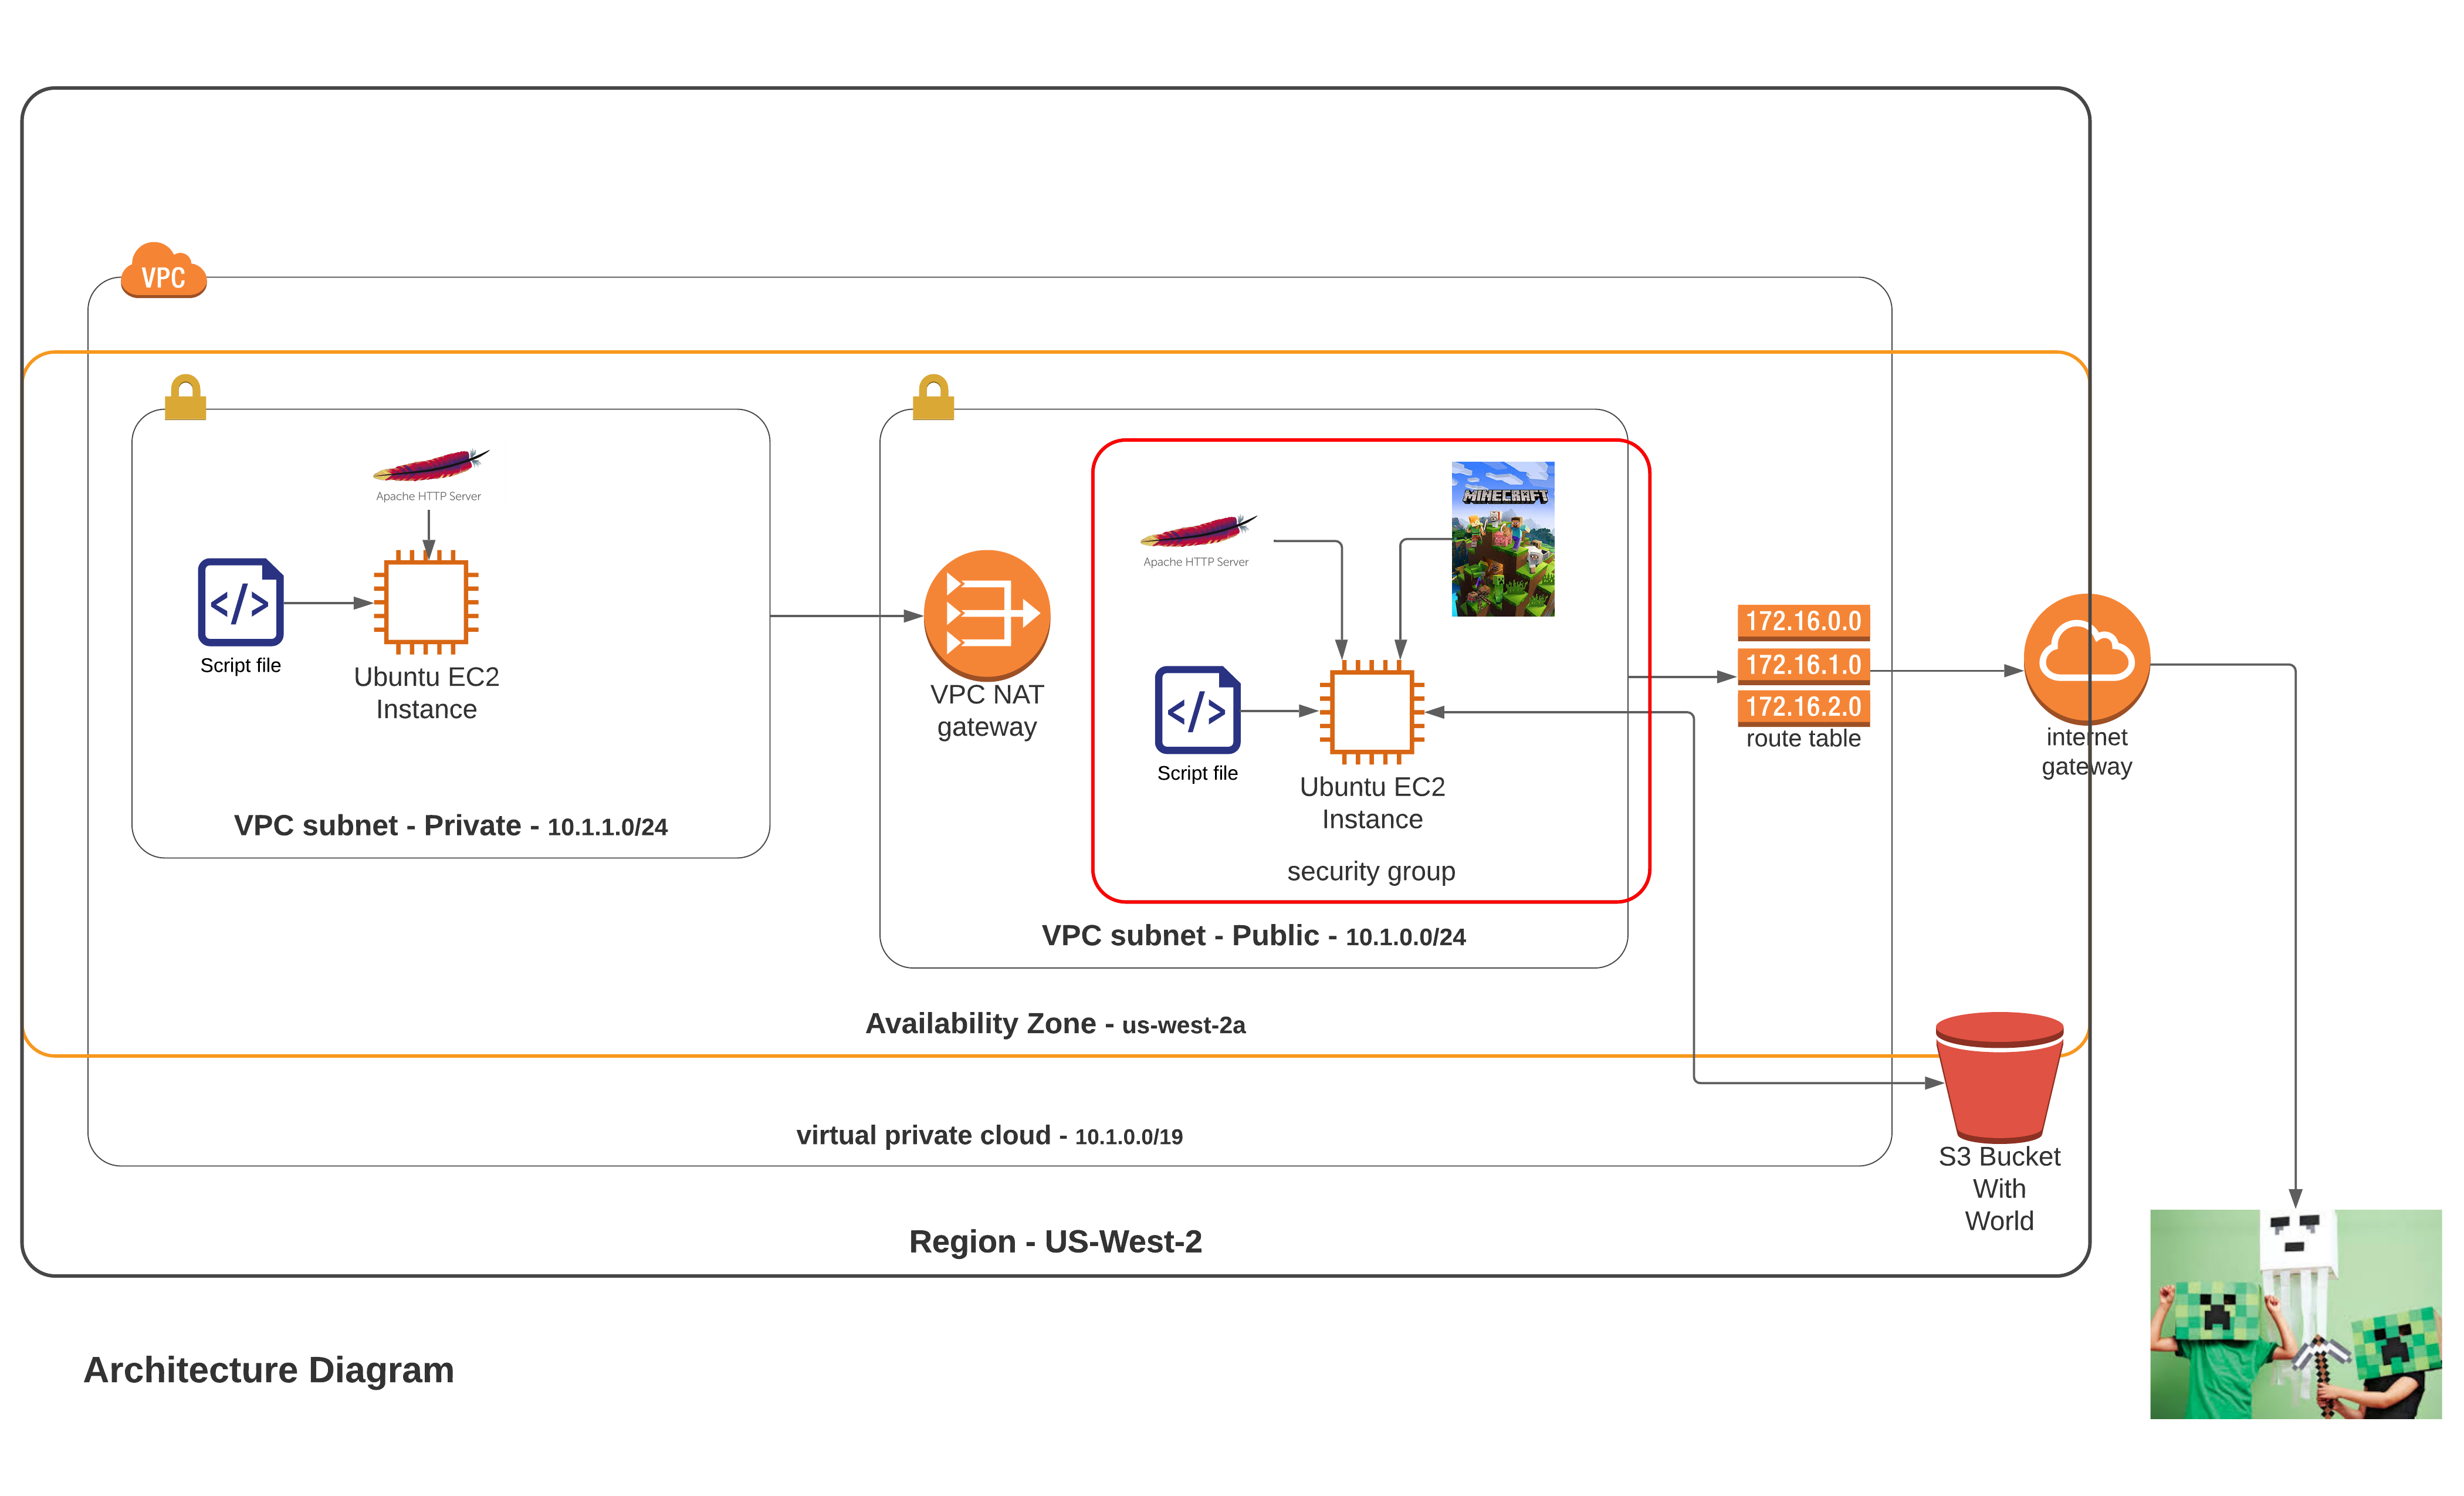
My previous post on creating a VPC gives us the outer portion of the diagram so if my turn off the VPC layer we can see what we need to implement here:
I'll assume you can handle the implementation of the kids on your own so lets start with the S3 bucket.
Create S3 Bucket
Creating an S3 bucket is pretty simple with the the aws_s3_bucket resource in Terraform. We will set ours to be privately accessible, so only our EC2 instance can reach it, and protect it from destruction if it has contents:
1 2 3 4 5 6 7 8 9 10 11 12resource "aws_s3_bucket" "mc" { bucket = "${local.resource_prefix}-bucket" acl = "private" force_destroy = false tags = merge( local.base_tags, { Name = "${local.resource_prefix}-mc-s3" directory = basename(path.cwd) }, ) }Create role and policy to access bucket with EC2 instance
Creating the role and permission we need to access it with our EC2 instance is a little harder but not to bad.
From the AWS Docs IAM roles
An IAM role is an IAM identity that you can create in your account that has specific permissions. An IAM role is similar to an IAM user, in that it is an AWS identity with permission policies that determine what the identity can and cannot do in AWS. However, instead of being uniquely associated with one person, a role is intended to be assumable by anyone who needs it. Also, a role does not have standard long-term credentials such as a password or access keys associated with it. Instead, when you assume a role, it provides you with temporary security credentials for your role session.
From the AWS Docs Policies and permissions in IAM
You manage access in AWS by creating policies and attaching them to IAM identities (users, groups of users, or roles) or AWS resources. A policy is an object in AWS that, when associated with an identity or resource, defines their permissions. AWS evaluates these policies when an IAM principal (user or role) makes a request. Permissions in the policies determine whether the request is allowed or denied. Most policies are stored in AWS as JSON documents. AWS supports six types of policies: identity-based policies, resource-based policies, permissions boundaries, Organizations SCPs, ACLs, and session policies.
These descriptions explain that a role is an identity and a policy is a set of permissions. Once we associate a role and a policy we can then grant that role to a user, or in our case a service, and we will have given our service permission to do something (read/write to an S3 bucket in this case).
First we define a role with the Terraform aws_iam_role resource for the EC2 instance we plan to create. This will allow the EC2 service to access resources in our account:
1 2 3 4 5 6 7 8 9 10 11 12 13 14 15 16 17 18 19 20 21 22 23 24 25resource "aws_iam_role" "ec2_s3_access_role" { name = "${local.resource_prefix}-s3-role" assume_role_policy = jsonencode({ Version = "2012-10-17" Statement = [ { Action = "sts:AssumeRole" Effect = "Allow" Sid = "" Principal = { Service = "ec2.amazonaws.com" } }, ] }) tags = merge( local.base_tags, { Name = "${local.resource_prefix}-s3-role" directory = basename(path.cwd) }, ) }Next we need to create a policy with the aws_iam_policy resource that grants permission to do whatever to the specific bucket we create:
1 2 3 4 5 6 7 8 9 10 11 12resource "aws_iam_policy" "s3_policy" { name = "${local.resource_prefix}-s3-world-bucket" description = "Policy for access to the world bucket" policy = jsonencode({ Version = "2012-10-17" Statement = [{ Effect = "Allow" Action = "s3:*" Resource = aws_s3_bucket.mc.arn }] }) }Then the policy needs to be attached to the role:
1 2 3 4 5resource "aws_iam_policy_attachment" "s3_policy_attach" { name = "${local.resource_prefix}-s3-policy-attachment" roles = [aws_iam_role.ec2_s3_access_role.name] policy_arn = aws_iam_policy.s3_policy.arn }And because we are doing this programmatically via Terraform, we need to create an instance profile that our EC2 instance will use to assume our new role:
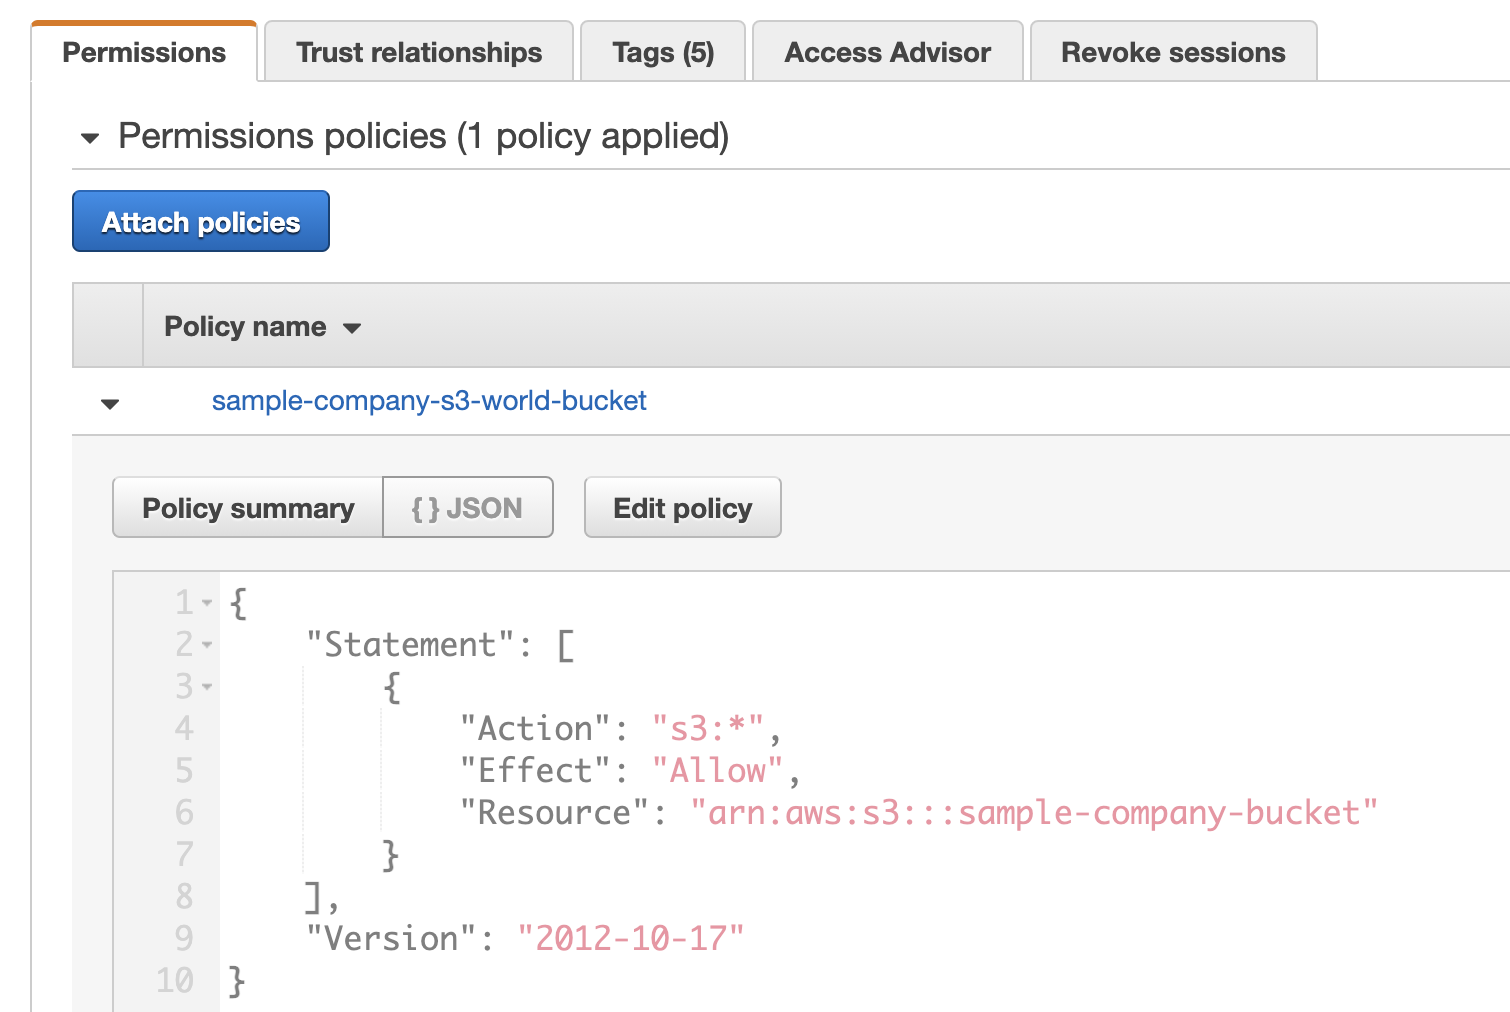
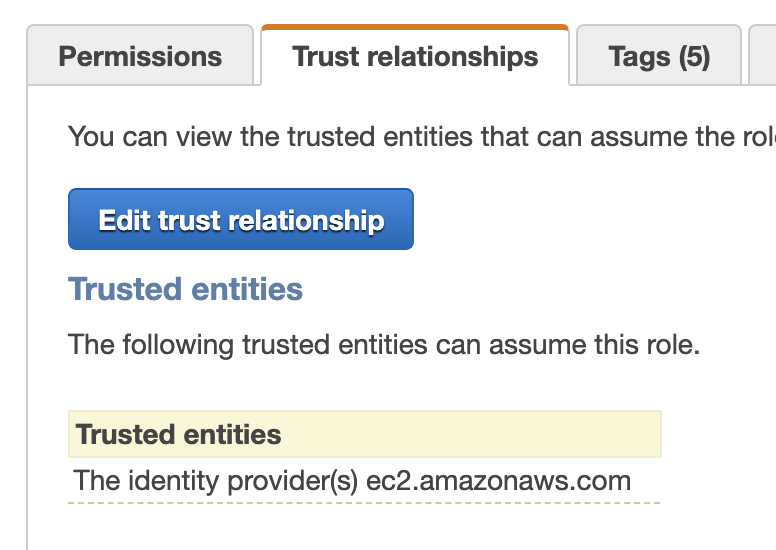
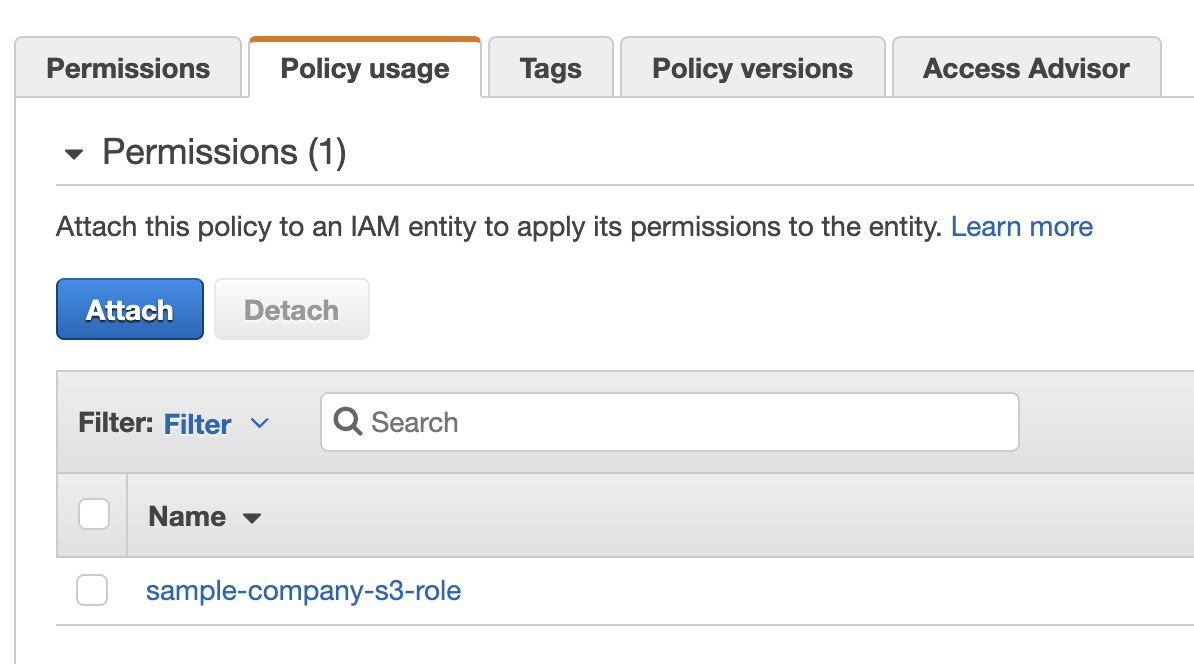
1 2 3 4resource "aws_iam_instance_profile" "ec2_profile" { name = "${local.resource_prefix}-ec2-profile" role = aws_iam_role.ec2_s3_access_role.name }Once we have deployed them we can see our role and policy in the console
There's a lot more we could delve into here but this gives us what we need to move on to creating our EC2 instances.
Create EC2 instances
This part is easy too right up to the point it's not. Making the EC2 instances is simple but the pain lies in the scripts that get executed upon creation and the systemd service that is responsible for managing the fetching and storage of our world directory. Once you get them right it's not bad but getting them to work exactly how you want can be tedious.
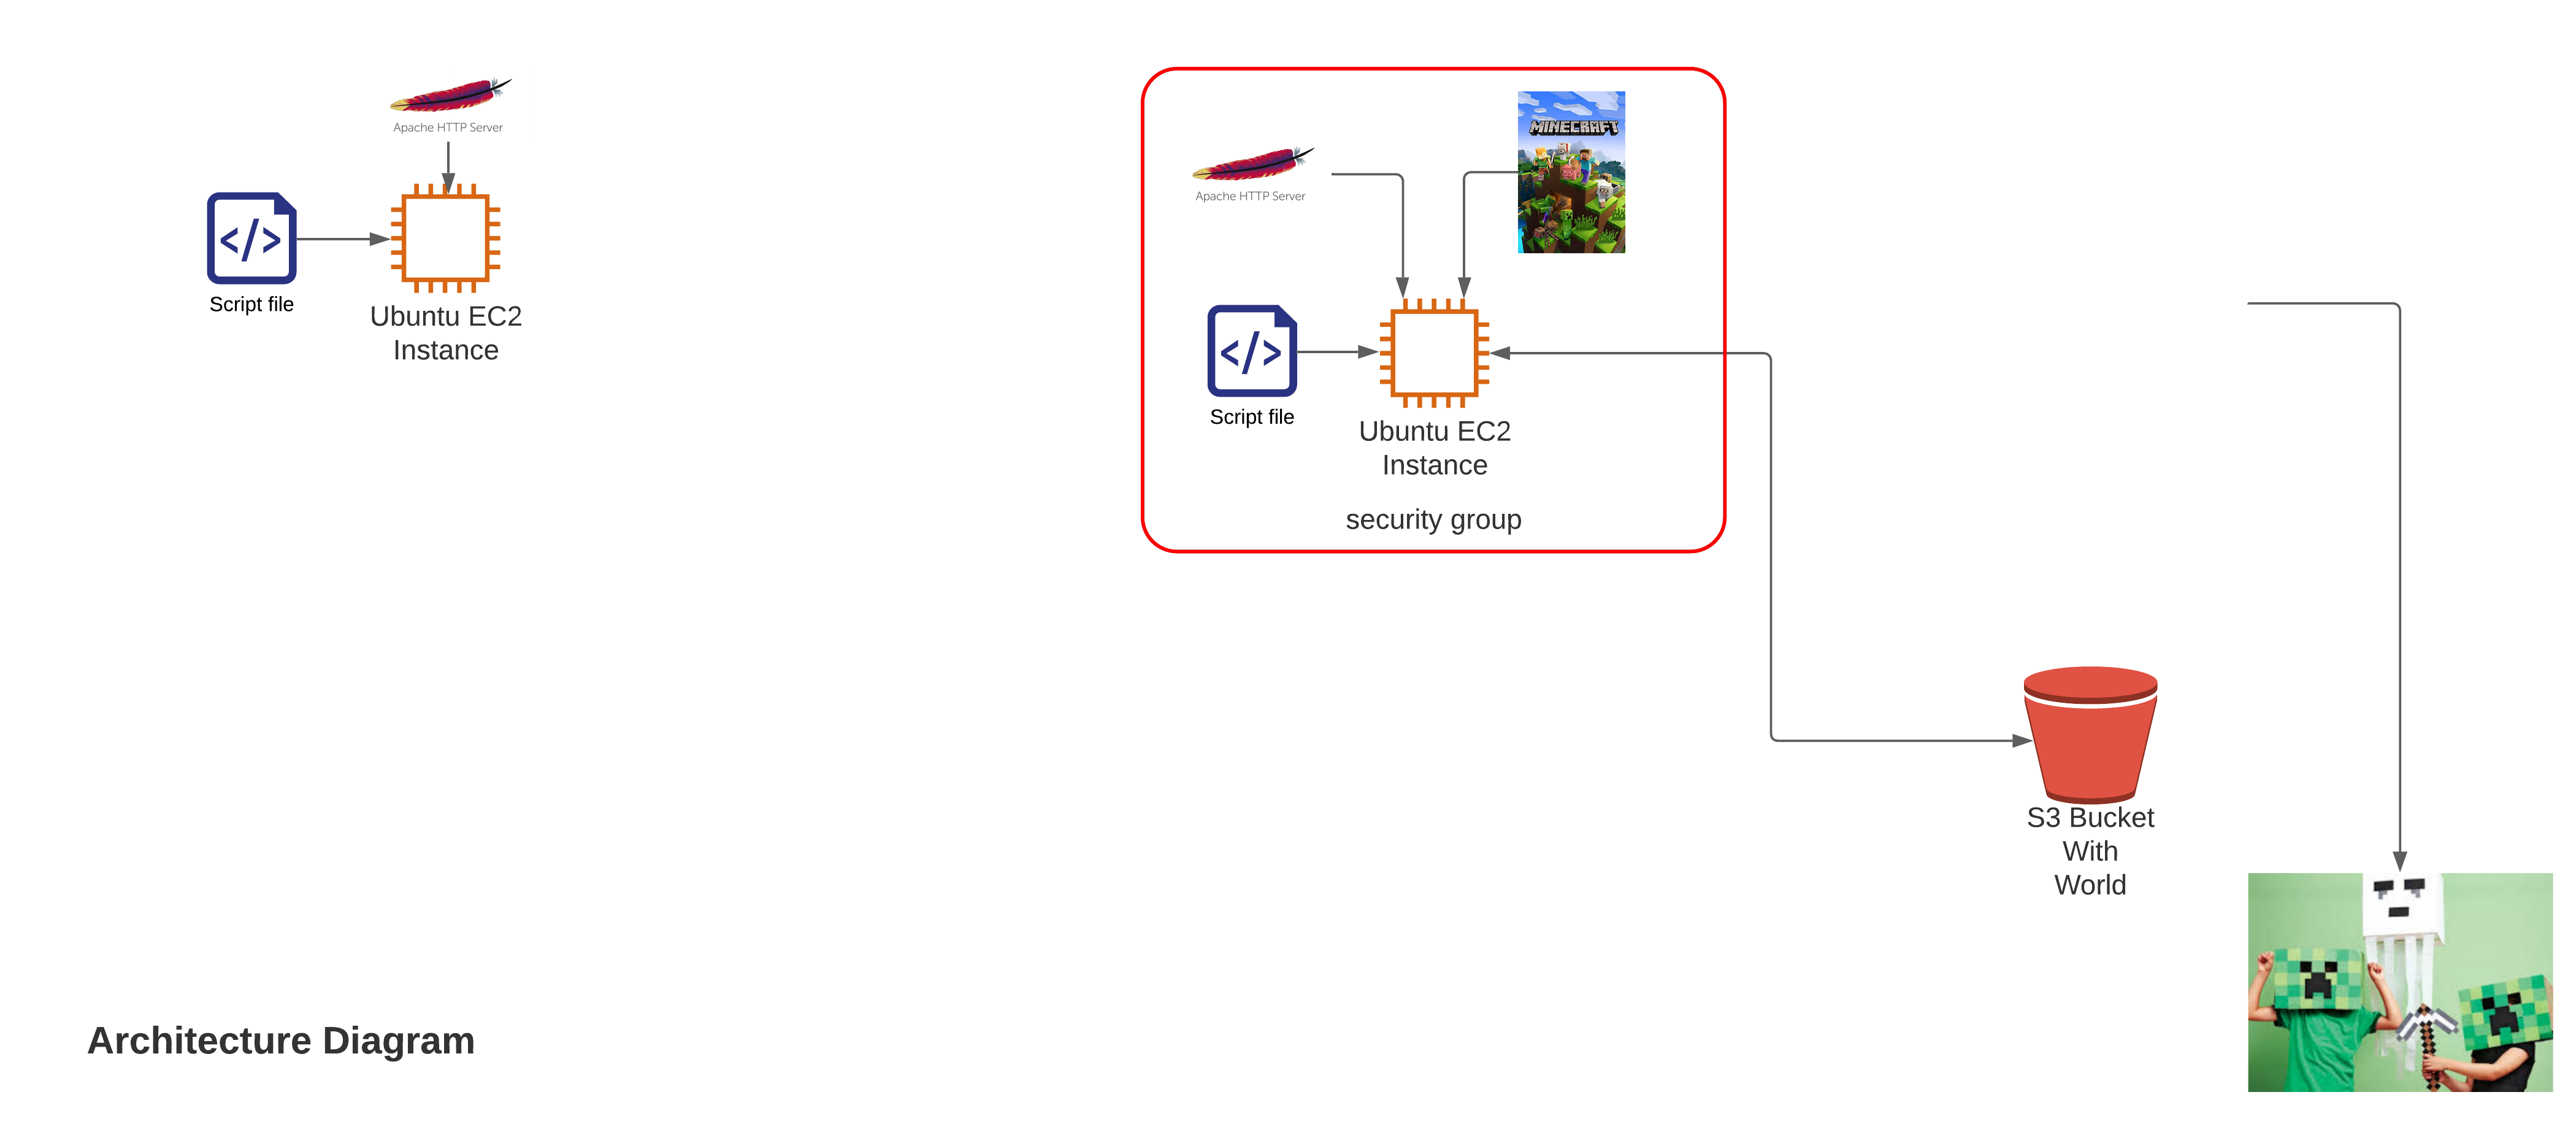
A lot of stuff comes together in the definition of our public EC2 instance that will run our minecraft server. This image shows the various parts:
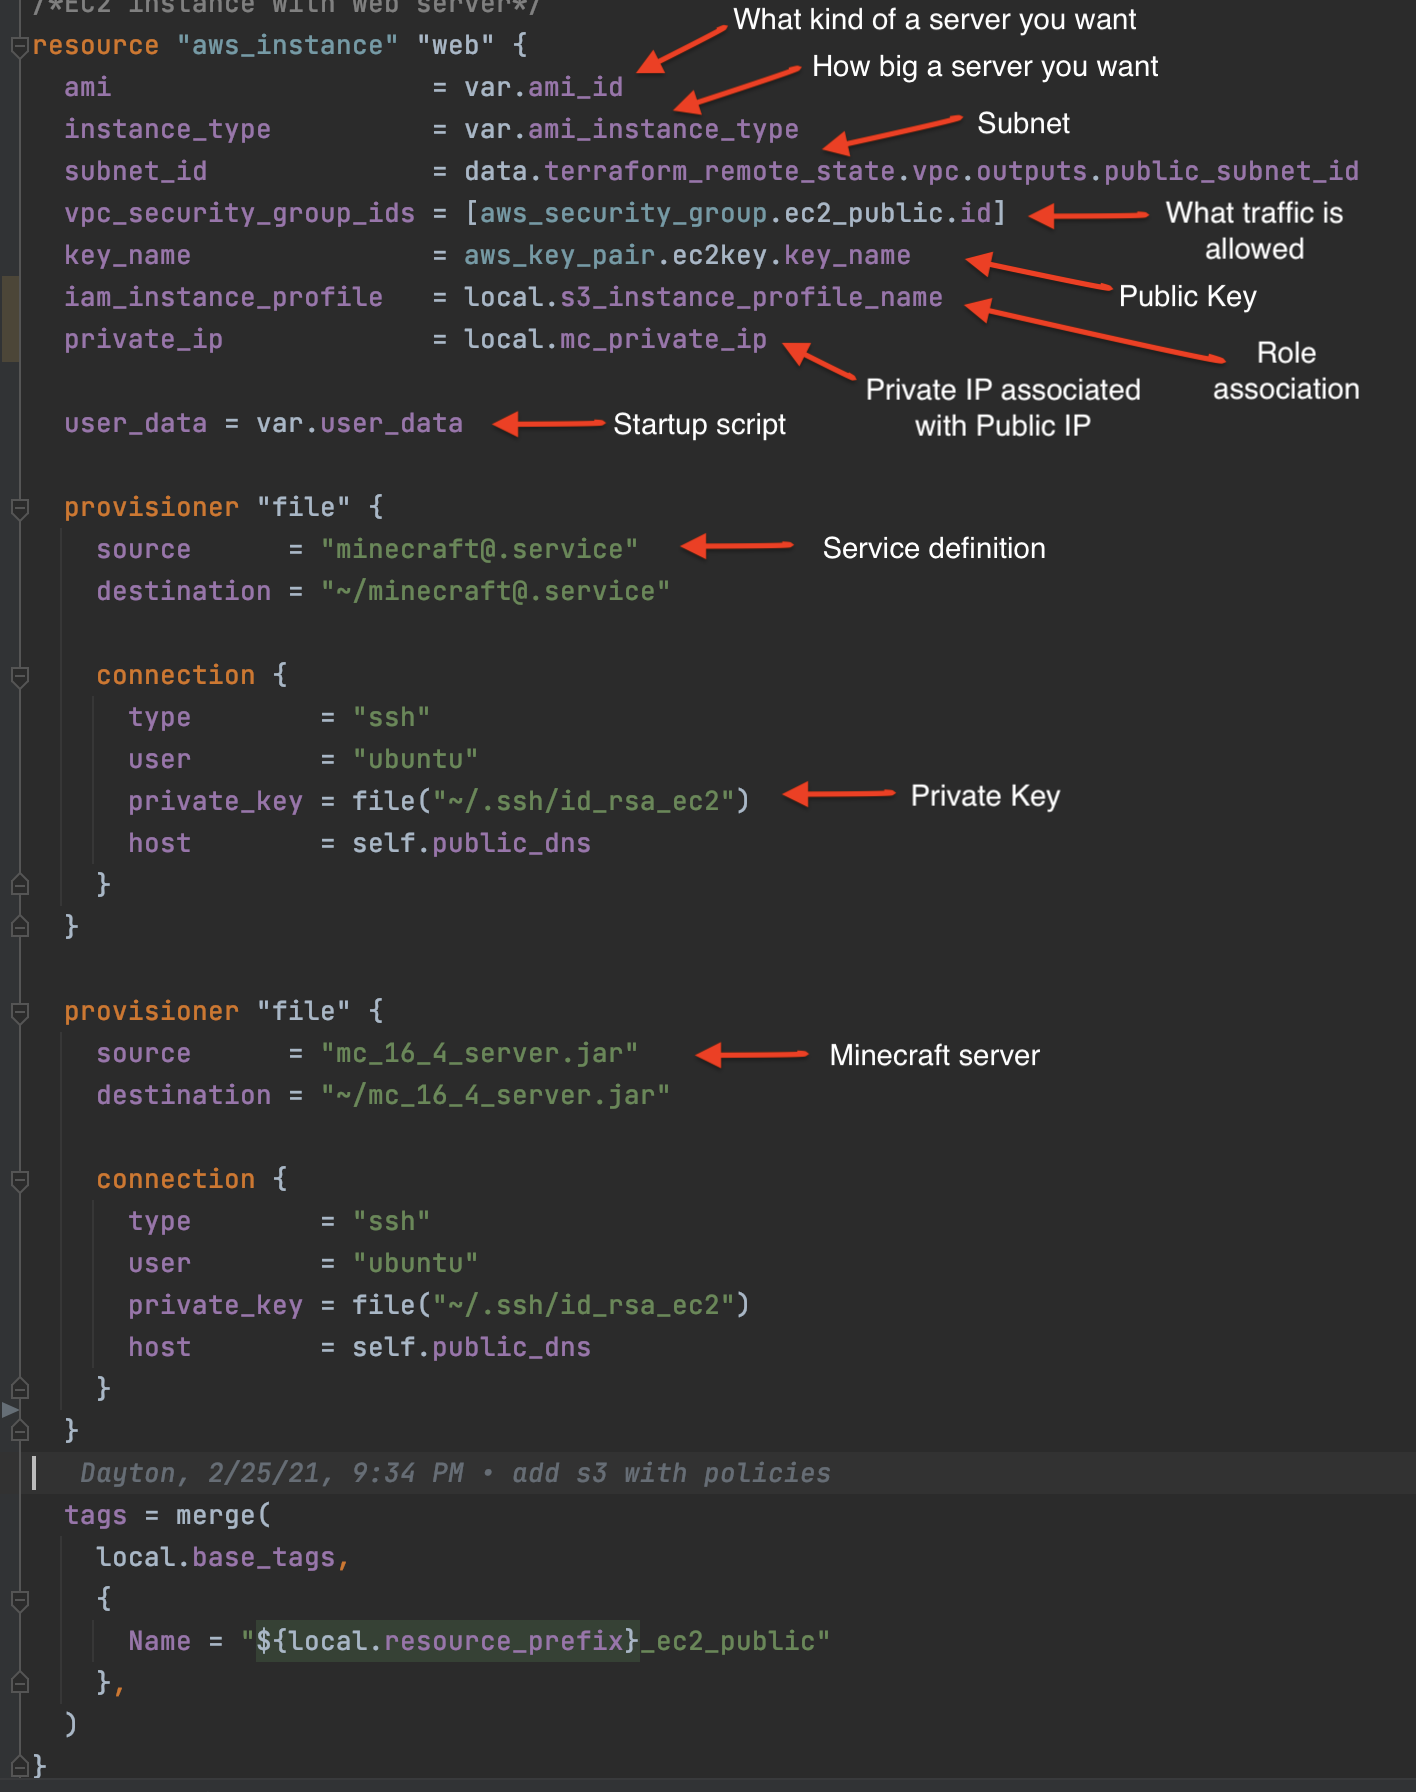
The file provisioner gives us a way to move our Minecraft.jar file and the service template we will use to sync our instance with our S3 bucket to our EC2 instance.
The instance profile gives our EC2 instance the permissions it needs to manage our S3 bucket. The part that ties the whole thing together is the user_data attribute which gives us a means to define a script that will execute upon the creation of our EC2 instance.
There is a bunch of stuff going on here but it's all pretty self explanatory:
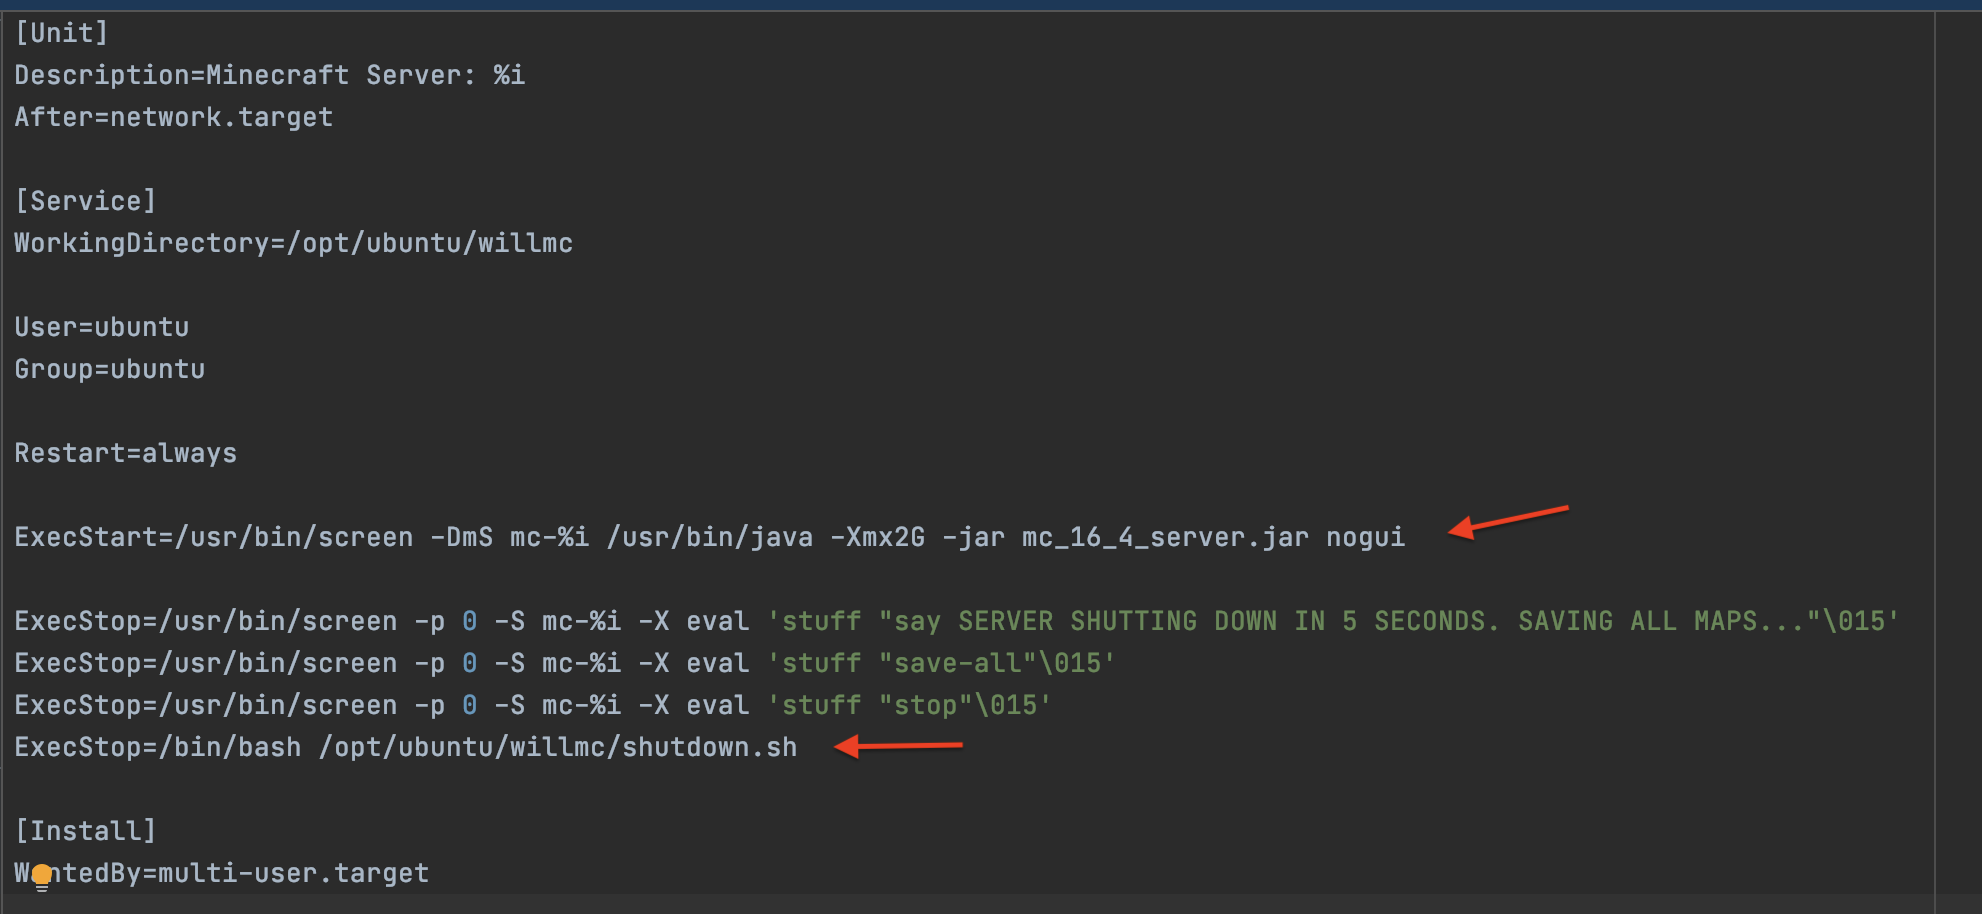
1 2 3 4 5 6 7 8 9 10 11 12 13 14 15 16 17 18 19 20 21 22 23 24 25 26 27 28 29 30 31 32 33 34 35 36 37 38 39 40 41 42 43 44 45 46 47 48 49 50 51 52 53 54 55 56 57 58 59 60 61 62 63 64#!/bin/sh # check logs # /var/log/cloud-init.log and # /var/log/cloud-init-output.log ### Updates and installs sudo apt-get update -y sudo apt-get install wget screen default-jdk nmap -y sudo apt install awscli -y ### Create directories for minecraft sudo mkdir /opt/ubuntu sudo mkdir /opt/ubuntu/willmc sudo chown -R ubuntu:ubuntu /opt/ubuntu/willmc/ ### Check if our bucket has anything in it list=$(aws s3 ls s3://sample-company-bucket/mcBackup/) ### If it does sync it to our EC2 instance and delete any lock files else do first time setup if echo $list |grep -wc "world/" ; then aws s3 sync s3://sample-company-bucket/mcBackup /opt/ubuntu/willmc sudo rm -f /opt/ubuntu/willmcworld/session.lock else ## Sets eula for minecraft sudo bash -c "echo eula=true > /opt/ubuntu/willmc/eula.txt" ## Copy minecraft jar to run directory cp /home/ubuntu/mc_16_4_server.jar /opt/ubuntu/willmc/mc_16_4_server.jar fi ### Make sure Ubuntu user owns it sudo chown -R ubuntu:ubuntu /opt/ubuntu/willmc/ ### Create shutdown script that will sync results of kiddies changes to their world back to S3 echo "aws s3 sync /opt/ubuntu/willmc s3://sample-company-bucket/mcBackup" > /opt/ubuntu/willmc/shutdown.sh sudo chmod uga+x /opt/ubuntu/willmc/shutdown.sh ### Make sure it is executable chmod uga+x /opt/ubuntu/willmc/mc_16_4_server.jar ### Create service for autostart of Minecraft server whenever instance starts/reboots sudo cp /home/ubuntu/minecraft@.service /etc/systemd/system/minecraft@.service sudo systemctl start minecraft@willmc sudo systemctl status minecraft@willmc sudo systemctl enable minecraft@willmc ### Enable firewall and open ports for Minecraft, SSH and Apache # https://wiki.ubuntu.com/UncomplicatedFirewall sudo ufw enable sudo ufw allow 25565/tcp sudo ufw allow 22/tcp sudo ufw allow 80/tcp ### Install apache for endpoint check and echo some simple HTML into an index file apt-get install -y apache2 service start apache2 chkconfig apache2 on instanceid="$(curl -s -H "X-aws-ec2-metadata-token: $TOKEN" -v http://169.254.169.254/latest/meta-data/instance-id 2>/dev/null)" echo "<html>" > /var/www/html/index.html echo "<h1>Welcome to Apache Web Server</h1>" >> /var/www/html/index.html echo "<h2>Created using Terraform</h2>" >> /var/www/html/index.html echo "<h4>Instance ID=$instanceid</h4>" >> /var/www/html/index.html echo "</html>" >> /var/www/html/index.htmlThe next piece of magic is the service template. The two important parts are the ExecStart which tells it to start Minecraft when our server starts and the all important 4th ExecStop that says run the script that will sync your world back to S3 before we unceremoniously deleting this server.
After I watched my 8 year old rage quit Minecraft for life over apparently losing all his diamonds (whatever that means), and then proceed to start playing again in less than 15 minutes, I thought about turning on versioning for my S3 bucket. But then I thought what kind of life lesson would I be teaching him by not letting him suffer the consequences of his actions? So suck it up little one, as survival mode makes abundantly clear, life is hard. But, if you don't subscribe to my baby shark parenting style, know that it is possible to version the files you are syncing back to S3 in case something goes awry and you need to back up to previous version of your world state.
Looking at our Terraform folder the last part that I'm really concerned with is limiting who can get to our server. To do that I define a security group in the ec2_security_group.tf:
We want to avoid leaving our server open to the whole world by setting up ingress rules that have bits like this:
1cidr_blocks = ["0.0.0.0/0"]so for our Minecraft server we will limit access to our local IP (you don't need 22 or 80 for Minecraft). The chomp part should put your public ip in the cidr_blocks, if you are running everything local, and you can obviously put an array of whatever IP's you want in there:
1 2 3 4 5 6 7 8 9 10 11 12 13 14 15 16 17 18 19 20 21 22 23 24 25 26 27 28 29 30 31 32 33 34resource "aws_security_group" "ec2_public" { name = "${local.resource_prefix}_ec2" vpc_id = data.terraform_remote_state.vpc.outputs.vpc_id ingress { from_port = 22 to_port = 22 protocol = "tcp" cidr_blocks = ["${chomp(data.http.myip.body)}/32"] } ingress { from_port = 80 to_port = 80 protocol = "tcp" cidr_blocks = ["${chomp(data.http.myip.body)}/32"] } ingress { from_port = 25565 to_port = 25565 protocol = "tcp" cidr_blocks = ["${chomp(data.http.myip.body)}/32"] } egress { from_port = 0 to_port = 0 protocol = "-1" cidr_blocks = ["0.0.0.0/0"] } tags = merge( local.base_tags, { Name = "${local.resource_prefix}_ec2" }, ) }Finally, we are ready to deploy this thing and bask in the glory of our creation. My 12 year old is convinced I'd have been done hours ago if I just read some stupid blog entry he found but he's to young to understand why the person who wrote that is clearly an idiot and has no idea how to properly over engineer something.
Assuming you have your VPC
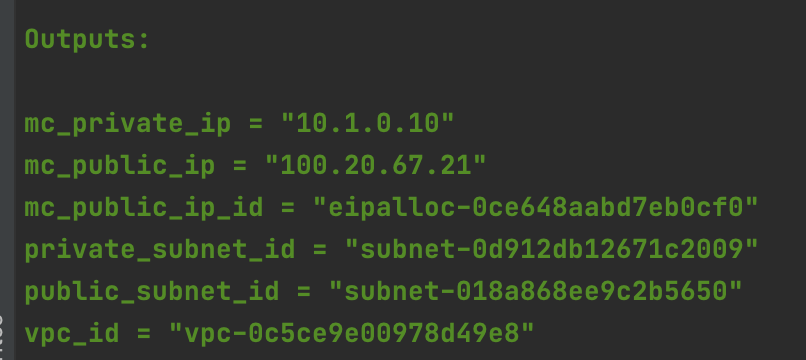
and your S3 bucket deployed
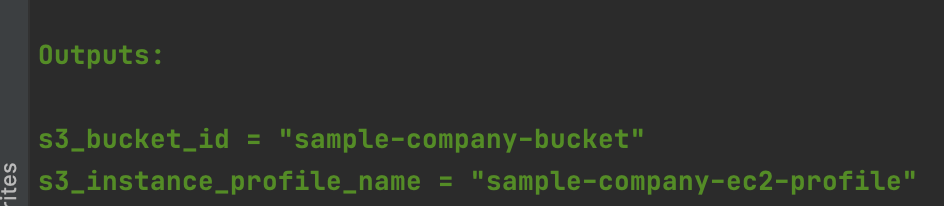
you should have the outputs stored in their respective state files that will allow us to successfully run terraform apply on our terraform_ec2 directory:
1 2 3 4 5 6 7 8 9 10 11 12 13 14 15 16 17 18 19 20 21 22 23 24 25 26 27 28 29 30 31 32 33 34terraform apply -auto-approve aws_key_pair.ec2key: Creating... aws_security_group.ec2_private: Creating... aws_security_group.ec2_public: Creating... aws_key_pair.ec2key: Creation complete after 1s [id=sample-company_publicKey] aws_security_group.ec2_private: Creation complete after 2s [id=sg-056c29f273b591cbc] aws_instance.web2: Creating... aws_security_group.ec2_public: Creation complete after 2s [id=sg-0bc194e10e0a1b1fe] aws_instance.web: Creating... aws_instance.web2: Still creating... [10s elapsed] aws_instance.web: Still creating... [10s elapsed] aws_instance.web: Provisioning with 'file'... aws_instance.web2: Still creating... [20s elapsed] aws_instance.web: Still creating... [20s elapsed] aws_instance.web2: Creation complete after 22s [id=i-0af98772d68da2ae2] aws_instance.web: Still creating... [30s elapsed] aws_instance.web: Provisioning with 'file'... aws_instance.web: Creation complete after 39s [id=i-071d7600670c59383] aws_eip_association.eip_assoc: Creating... aws_eip_association.eip_assoc: Creation complete after 1s [id=eipassoc-0768156bed17736c0] Apply complete! Resources: 6 added, 0 changed, 0 destroyed. Outputs: copy_private_key_to_ec2 = "scp -i ~/.ssh/id_rsa_ec2 ~/.ssh/id_rsa_ec2 ubuntu@44.239.221.41:~/.ssh/id_rsa_ec2" curl_local_host = "curl http://localhost" curl_private_host = "curl http://10.1.1.126" key_id = "sample-company_publicKey" key_name = "sample-company_publicKey" private_ssh_link = "ssh -i ~/.ssh/id_rsa_ec2 ubuntu@10.1.1.126" public_ssh_link = "ssh -i ~/.ssh/id_rsa_ec2 ubuntu@44.239.221.41" webserver_ip = "44.239.221.41" webserver_link = "http://44.239.221.41" The outputs should give us all the connection strings we need to test it.
The public ssh should get you right in to your public instance while the private one should fail from your local machine but work fine from within your public instance ()after you copy a private key to the public instance):
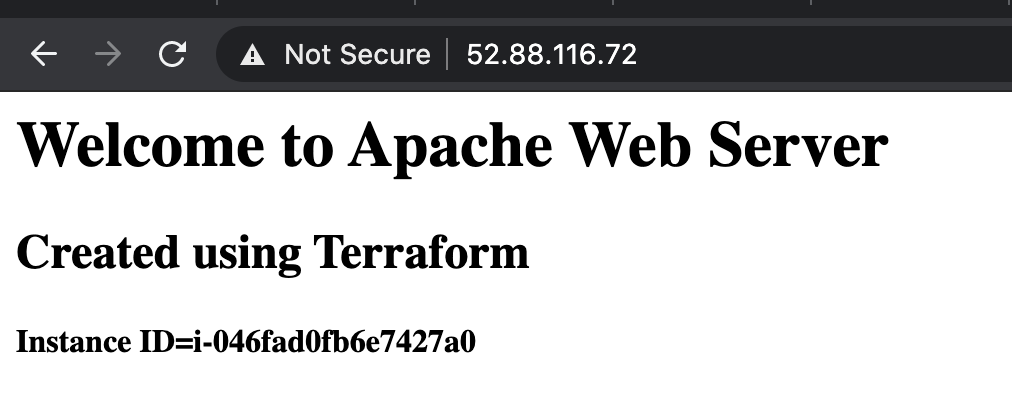
1 2➜ terraform_ec2 git:(main) ✗ ssh -i ~/.ssh/id_rsa_ec2 ubuntu@10.1.1.236 ssh: connect to host 10.1.1.236 port 22: Network is unreachable1 2 3 4 5 6 7 8 9 10 11 12 13 14 15 16 17 18 19 20 21 22 23 24 25 26 27 28 29copy_private_key_to_ec2 = "scp -i ~/.ssh/id_rsa_ec2 ~/.ssh/id_rsa_ec2 ubuntu@52.88.116.72:~/.ssh/id_rsa_ec2" curl_local_host = "curl http://localhost" curl_private_host = "curl http://10.1.1.240" key_id = "sample-company_publicKey" key_name = "sample-company_publicKey" private_ssh_link = "ssh -i ~/.ssh/id_rsa_ec2 ubuntu@10.1.1.240" public_ssh_link = "ssh -i ~/.ssh/id_rsa_ec2 ubuntu@52.88.116.72" webserver_ip = "52.88.116.72" webserver_link = "http://52.88.116.72" ➜ terraform_ec2 git:(main) ✗ scp -i ~/.ssh/id_rsa_ec2 ~/.ssh/id_rsa_ec2 ubuntu@52.88.116.72:~/.ssh/id_rsa_ec2 id_rsa_ec2 100% 2622 195.4KB/s 00:00 ➜ terraform_ec2 git:(main) ✗ ssh -i ~/.ssh/id_rsa_ec2 ubuntu@52.88.116.72 ubuntu@ip-10-1-0-10:~$ ssh -i ~/.ssh/id_rsa_ec2 ubuntu@10.1.1.240 ubuntu@ip-10-1-1-240:~$ curl http://localhost <html> <h1>Welcome to Apache Web Server</h1> <h2>Created using Terraform</h2> <h4>Instance ID=i-04bde504b37f90be6</h4> </html> ubuntu@ip-10-1-1-240:~$ exit logout Connection to 10.1.1.240 closed. ubuntu@ip-10-1-0-10:~$ curl http://10.1.1.240 <html> <h1>Welcome to Apache Web Server</h1> <h2>Created using Terraform</h2> <h4>Instance ID=i-04bde504b37f90be6</h4> </html> ubuntu@ip-10-1-0-10:~$ We prove out our connectivity and the success of our Apache install by showing we can ssh into our private instance and curl our simple index file. That proves the NAT gateway we set up in our VPC allowed our private instance to reach out to the internet for its software installs. A quick check in the browser shows we have successfully installed and routed our public Apache instance:
and now we can check our Minecraft server status and see if my latest instance of a server has inherited files from the S3 bucket:
1 2 3 4 5 6 7 8 9 10 11 12 13 14ubuntu@ip-10-1-0-10:/opt/ubuntu/willmc$ ls banned-ips.json banned-players.json eula.txt logs mc_16_4_server.jar ops.json server.properties shutdown.sh usercache.json whitelist.json world ubuntu@ip-10-1-0-10:/opt/ubuntu/willmc$ sudo systemctl status minecraft@willmc ● minecraft@willmc.service - Minecraft Server: willmc Loaded: loaded (/etc/systemd/system/minecraft@.service; indirect; vendor preset: enabled) Active: active (running) since Wed 2021-03-03 05:44:26 UTC; 1min 16s ago Main PID: 9966 (screen) Tasks: 32 (limit: 4686) CGroup: /system.slice/system-minecraft.slice/minecraft@willmc.service ├─9966 /usr/bin/SCREEN -DmS mc-willmc /usr/bin/java -Xmx2G -jar mc_16_4_server.jar nogui └─9981 /usr/bin/java -Xmx2G -jar mc_16_4_server.jar nogui Mar 03 05:44:26 ip-10-1-0-10 systemd[1]: Started Minecraft Server: willmc. ubuntu@ip-10-1-0-10:/opt/ubuntu/willmc$It's up and alive and we can see a big set of files were apparently copied over. If you have any doubts about what happened during startup you can check the logs:
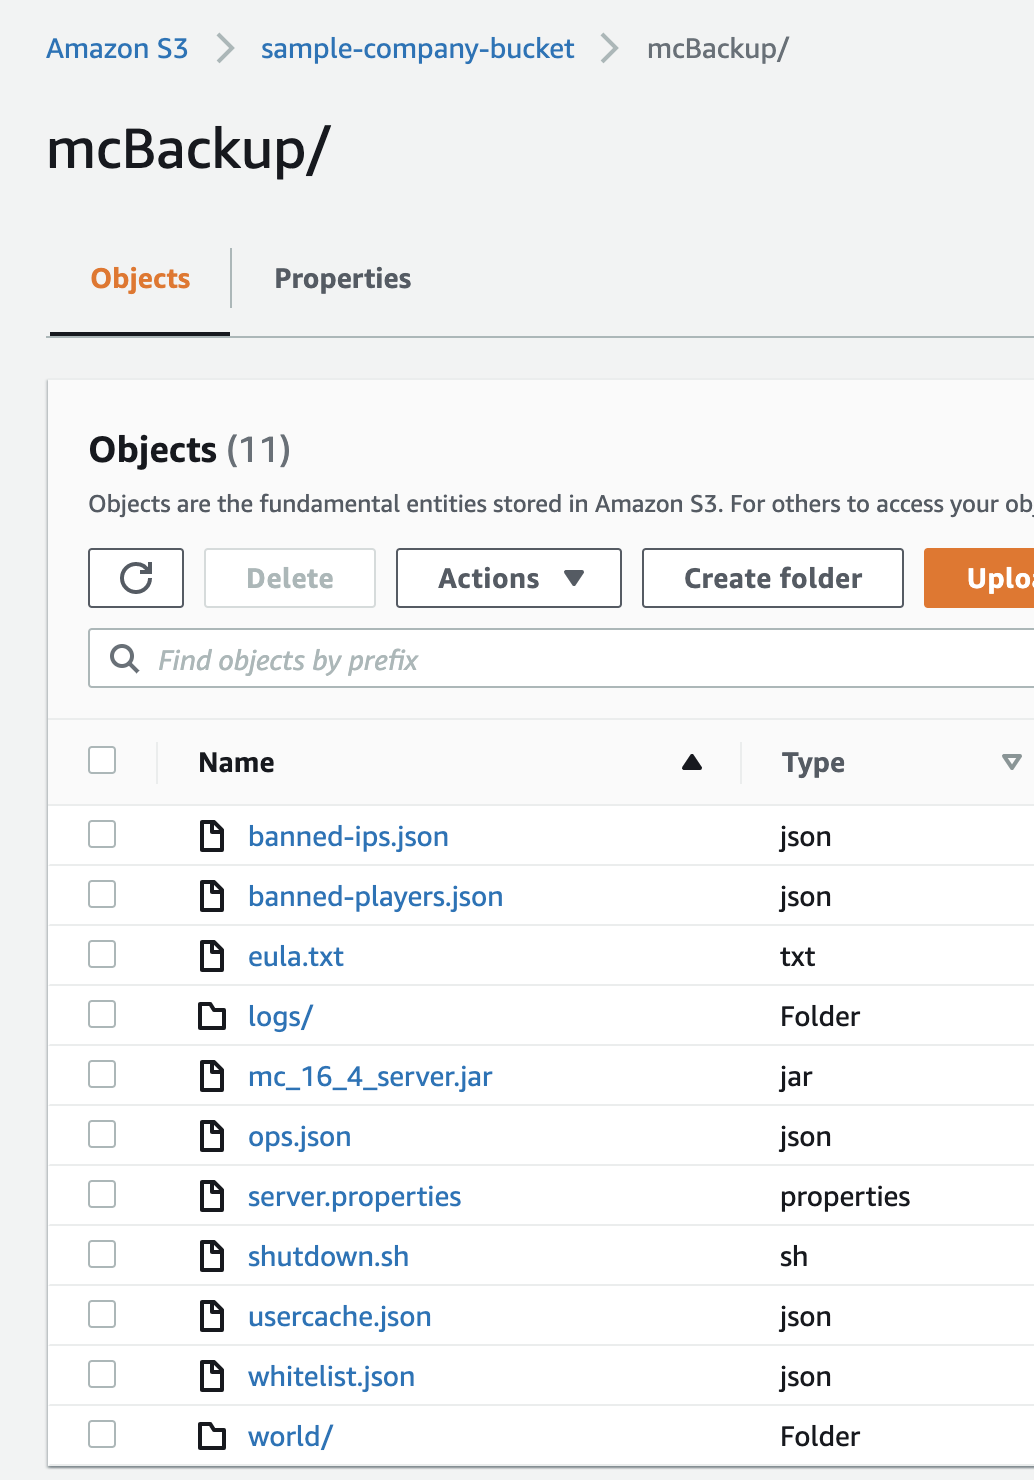
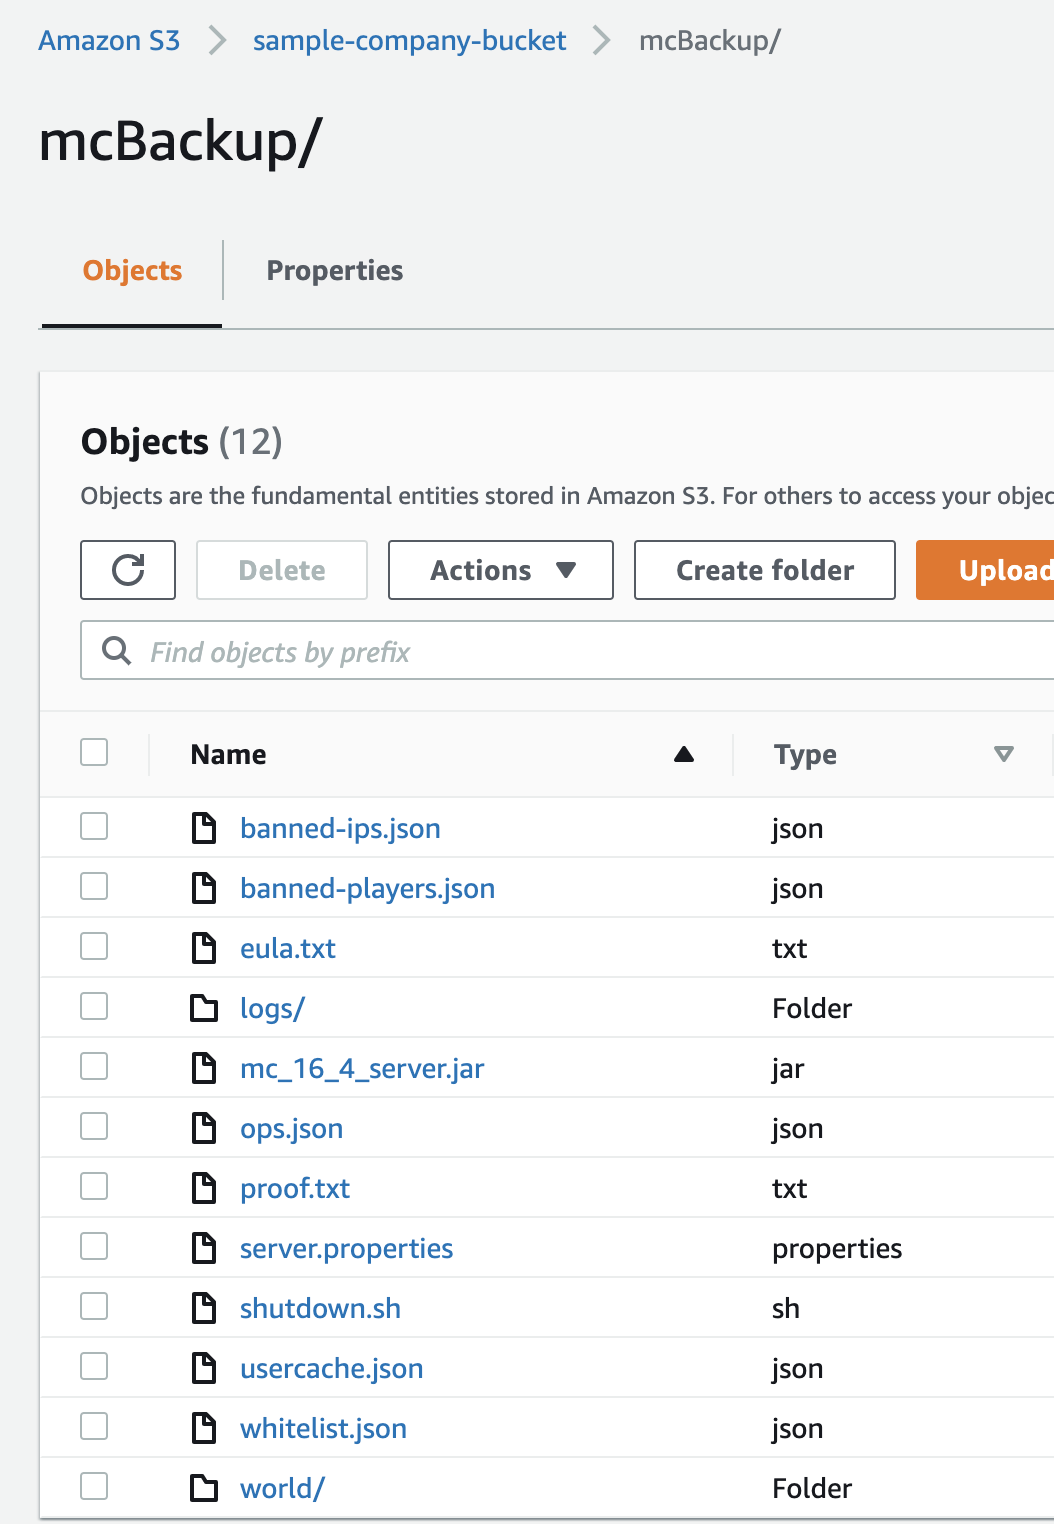
1 2 3 4 5ubuntu@ip-10-1-0-10:/opt/ubuntu/willmc$ cd /var/log/ ubuntu@ip-10-1-0-10:/var/log$ ls alternatives.log apache2 auth.log cloud-init-output.log dist-upgrade fontconfig.log kern.log lastlog syslog unattended-upgrades amazon apt btmp cloud-init.log dpkg.log journal landscape lxd tallylog wtmp ubuntu@ip-10-1-0-10:/var/log$ vi cloud-init-output.logFor proof that our sync back to S3 works we can create a file in the /opt/ubuntu/willmc directory and then destroy our instance. If it works we should see our file in S3 (you could also play Minecraft) after our instance is destroyed:
1 2 3 4 5 6 7 8ubuntu@ip-10-1-0-10:/var/log$ cd /opt/ubuntu/willmc/ ubuntu@ip-10-1-0-10:/opt/ubuntu/willmc$ ls banned-ips.json banned-players.json eula.txt logs mc_16_4_server.jar ops.json server.properties shutdown.sh usercache.json whitelist.json world ubuntu@ip-10-1-0-10:/opt/ubuntu/willmc$ echo "This proves it!!!!!!" > proof.txt echo "This proves itlslsls" > proof.txt ubuntu@ip-10-1-0-10:/opt/ubuntu/willmc$ ls banned-ips.json banned-players.json eula.txt logs mc_16_4_server.jar ops.json proof.txt server.properties shutdown.sh usercache.json whitelist.json world ubuntu@ip-10-1-0-10:/opt/ubuntu/willmc$Checking our S3 bucket before we see :
Now gently eradicate our server:
1 2 3 4 5 6 7 8 9 10 11 12 13 14 15 16 17 18 19 20 21 22terraform_ec2 git:(main) ✗ terraform destroy -auto-approve aws_eip_association.eip_assoc: Destroying... [id=eipassoc-078c38f9e56ba06a1] aws_instance.web2: Destroying... [id=i-0f25f3c362d883891] aws_eip_association.eip_assoc: Destruction complete after 1s aws_instance.web: Destroying... [id=i-053edeb44ecce49b3] aws_instance.web2: Still destroying... [id=i-0f25f3c362d883891, 10s elapsed] aws_instance.web: Still destroying... [id=i-053edeb44ecce49b3, 10s elapsed] aws_instance.web2: Still destroying... [id=i-0f25f3c362d883891, 20s elapsed] aws_instance.web: Still destroying... [id=i-053edeb44ecce49b3, 20s elapsed] aws_instance.web2: Still destroying... [id=i-0f25f3c362d883891, 30s elapsed] aws_instance.web2: Destruction complete after 30s aws_security_group.ec2_private: Destroying... [id=sg-0e95bea130aaf9617] aws_security_group.ec2_private: Destruction complete after 1s aws_instance.web: Still destroying... [id=i-053edeb44ecce49b3, 30s elapsed] aws_instance.web: Destruction complete after 31s aws_key_pair.ec2key: Destroying... [id=sample-company_publicKey] aws_security_group.ec2_public: Destroying... [id=sg-04ef77127230486df] aws_key_pair.ec2key: Destruction complete after 0s aws_security_group.ec2_public: Destruction complete after 1s Destroy complete! Resources: 6 destroyed. ➜ terraform_ec2 git:(main) ✗And we can see our shutdown script has done it's job:
Conclusion
My kids have no idea how good they have it.
I hope this post helps someone else look good in front of their kids or at the very least their boss.
I think this example does a pretty good job of touching on a lot of key concepts you will encounter in the real world and shows how you can take advantage of some of the key benefits of the cloud:
- Automated deployment using infrastructure as code
- Only paying for resources when you actually need them